ChronoPay Configuration
Before proceeding, make sure to read about Web Payment Systems Manager.
In order to configure ChronoPay, download and install the latest ChronoPay .hsp package from http://download.hsphere.parallels.com/downloads/index.html#web_payment.
Setting Up ChronoPay
Once you have registered a ChronoPay business account, enable ChronoPay in your control panel:
- Select Merchant Gateways in the Settings->Payment Settings menu.
- On the Merchant Configuration page, choose ChronoPay from the drop-down menu.
- Click the Edit button to activate it.
- Enter the required parameters in the ChronoPay form:
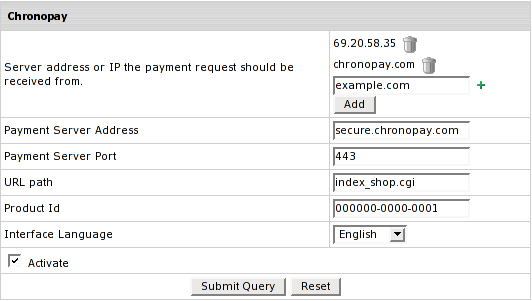
- Server address or IP the payment request should be received from: set the IP where payment notification requests come from. Payment requests from other IPs will be rejected which helps to avoid fraud.
Note: You can enter IP mask instead of IP, for instance 127.0.0.* or 127.0.*.*. Also you can specify the server name. - Payment Server Address you will be redirected to for payment operations
- Payment Server Port: enter the port to be used
- URL path - the path to the server side handler file. This can be a script or a binary file that is launched with an http request.
- Product ID: the ID provided to you by ChronoPay system upon registration.
- Interface Language: choose the language from the drop-down box
- Check Activate to enable ChronoPay for new signups and existing accounts.
- Click Submit Query. ChronoPay now must show as active.