Demo Plans
This section explains how to create demo plans using plan creation wizards. Demo plans allow creating demo end user accounts to demonstrate the capabilities of Parallels H-Sphere without having to use real resources. In demo mode, resources and services aren't created or used, but their creation and usage is simulated in the user control panel. For instance, users can create mailboxes, and the control panel will behave as if the mailboxes have been created, but in fact they haven't.
Demo plans, similarly to regular plans, are created with Plan Creation Wizards:
- Select Create in the Plans menu.
- In the list of plans select the plan.
- On Step 1 of the wizard, enter a name for the plan and choose the resources you want to demonstrate in the user demo control panel.
Note: In user control panels, many resources will show as disabled even if you include them into the plan. See below for their list. - Scroll down to the Settings section and check the Demo Only Mode box.
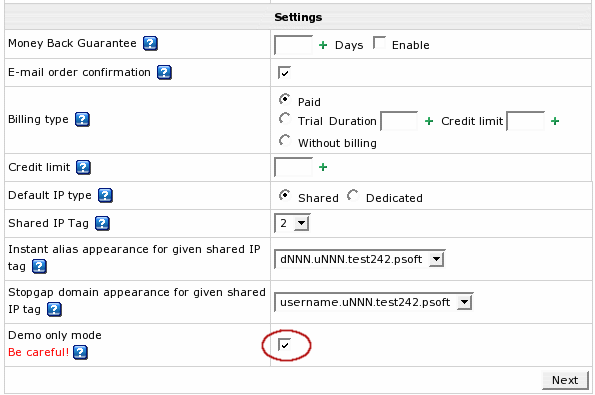
Important: You won't be able to turn this option off in the plan editor later.
- Click Next to proceed. Skip domain registration page if it appears.
- Step 2 shows the fields to enter free amount of resources necessary for the system to operate.
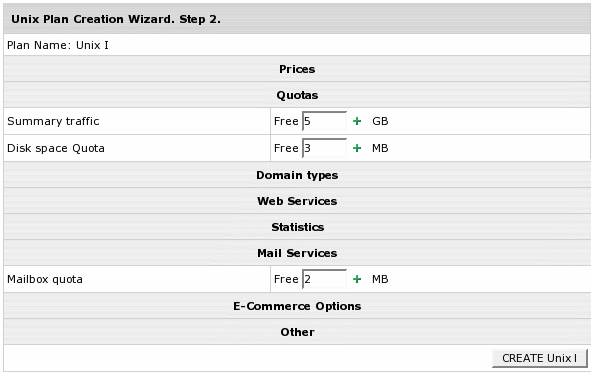
Note: You don't need to enter prices or free units.
- Click Next to complete plan creation.
- Once the Demo plan is created, go back to Manage in the Plans menu and turn the newly created plan ON for user signups.
- If you want to create more payment periods for the plan, go to Plans -> Manage -> Settings and add as many payment periods as you need.
Now that the plan is created and enabled, users can sign up for it and navigate their control panels. If they like the system and want to go ahead and buy it, they will have to sign up again under a paid plan. Demo Mode doesn't allow switching plans.
Remember that a demo account takes a user license like any other Parallels H-Sphere user account.
Demo plans demonstrate how to:
- Transfer domains previously created
- Add subdomains
- Add Stopgap domains
- Create Third level domains
- Add domain aliases
- Create Parked domains
- Use Trouble Ticket support system
- Add Front Page extensions
- Change disk quota and traffic usage
- Change billing period
- Create MySQL, MS SQL and PgSQL databases
- Set Summary Disk Usage
- Create FTP sub-account - additional logins and passwords to main directory
- View Error, Transfer, and Agent logs
Demo plans don't allow to:
- Have a home directory on the web server
- Have mailboxes and other mail resources
- Have MySQL / PGSQL / MS SQL databases
- Register domains through the domain registrars
- Create Service Domains
- Use Site Studio site construction tool
- Use third party products such as Miva, osCommerce, Modlogan, Webalizer, cgi scripts, etc.