Step 1. Selecting Resources and Configuring Plan Settings
On the first step, select which resources will be available and active in the plan.
Note that Plan Wizards display only those resources that are enabled globally in the system. Read about Global Resources for more info.
- Include: check the box to have the resource available for users subscribing for the plan. If you leave this box unchecked, users of this plan will be unable to take advantage of this resource. Checking Include alone doesn't activate this resource by default; in newly created accounts it will be off.
- Activated determines whether the resource should be enabled immediately at signup (checked) or activated later by the user (unchecked). If a pay resource has Activated unchecked, it won't be included in the signup bill, but users will be able to turn it on when necessary and will be charged for it at the moment of activation. But if a pay resource has Activated checked, it will be included in the signup bill, and will be charged for when users enable it in their control panel. If the activated resource has some pay child resources also activated in the plan wizard, they will be included in the signup bill and user will be charged for them at the moment of activating the parent resource.
Some of the plan's resources are integral to the system and cannot be excluded from the plan. They are not available on this page.
Note: If you exclude resources that are in use by some users, they'll remain functional but become inaccessible from the user control panel.
First, you enter Plan name for the plan you are creating. Later you can change the plan name in the Plan Settings.

Then, Step 1 allows you to configure the following hosting resources:
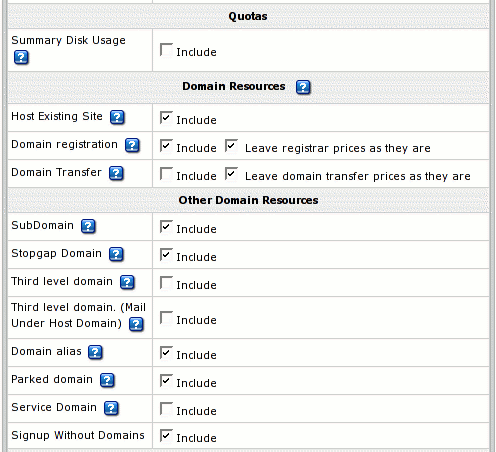
- Summary Disk Usage: unchecking this box will stop the system from billing end users for disk usage.
- Host Existing Site : allows to host domains registered outside Parallels H-Sphere without transfering them into supported registrars.
- Domain registration: allow users to create new standard domains through domain registration services supported in Parallels H-Sphere.
- Leave registrar prices as they are: Check this box to skip the second step of the wizard and use the default prices. To enter custom domain registration prices, don't check this box.
- Domain Transfer: allows users to transfer domains already registered outside Parallels H-Sphere with any registar to OpenSRS or Enom.
- Leave domain transfer prices as they are: Check this box to skip the second step of the wizard and use the default prices. To enter custom domain transfer prices, don't check this box.
- SubDomain: allow users to create subdomains. Subdomains have the same functionalities as regular domains.
- Stopgap Domain: allow your customers to use hosting services without a real domain. Stopgap domains don't have DNS zones, and don't allow e-mail service. Still, users can access their sites using their instant domain aliases.
Stopgap domains support web site management and FTP services. Also, IP-only access is possible with a dedicated IP. - Third level domain: allow your customers to create third level domains based on the domain names you offer. E.g. if your domain name is example.com, a user can have a domain like thirdlevel.example.com. Third level domains have the same functionalities as second level domains, i.e. regular domains.
- Domain alias: (also referred to as stack domain) an extra domain name that points to a 'primary' domain. For example, the owner of the domain name example.com can register another domain name, e.g. example.net and have it point to the location of example.com. This means that every Internet user who goes to example.net will land in example.com. Domain alias can have its own DNS zone, custom DNS records and their own mail service.
- Parked domain: allow your customers to use Parallels H-Sphere DNS server for designating IPs to domain names serviced and hosted on other servers (not those of Parallels H-Sphere).
- Service Domain: should be included only for the administrative plans (like System plan) to host and manage your corporate web- site. To enable users register third level domains with the second level domain name of your corporate site, register it as a service domain. For example, the company offers third level domains at example.com, such as thirdlevel.example.com or userdomain.example.com. Naturally, the site of the hosting company should be available at example.com or www.example.com.
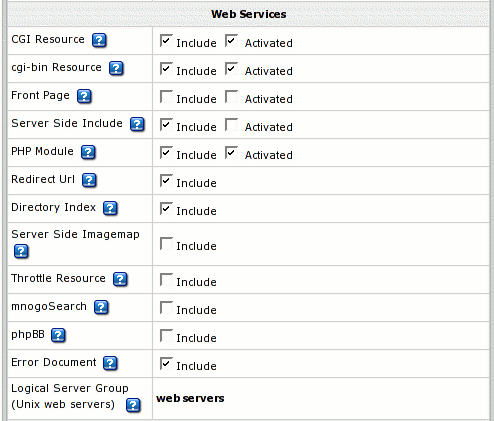
- CGI Resource: allow your customers to map file extensions as CGI executables.
- cgi-bin Resource: allow your customers to create cgi-bin directory, so all the cgi-bin directory's content is treated as cgi executables which the server tries to run.
- Front Page: allow your customers to use FrontPage extensions on their web sites.
- Server Side Include: allow your customers to use interactive real-time features such as echoing current time, conditional execution based on logical comparisons, querying or updating a database, sending an e-mail etc., with no programming or CGI scripts.
- PHP Module: allow your customers to create dynamic web pages with PHP.
- Redirect URL: allow your customers to redirect visitors from one URL to another. When an Internet user tries to connect to a URL that is redirected, he is taken to the address this URL is mapped to.
- Directory Index: allow your customers to set their custom directory indexes
- Server Side Imagemap: allow your customers to have files with a specific extension regarded as map files
- Throttle Resource: allow your customers 'throttle' the use of traffic in their accounts by delaying or refusing requests to their sites.
- mnogoSearch: allow your customers to use Parallels H-Sphere integrated search engine that searches their sites by keywords.
- php BB: allow your customers to use php BB, Parallels H-Sphere integrated, high powered, fully scalable, and highly customizable bulletin board package.
- Error document: allow your customers to configure their own error pages that are shown when the requested pages fail to open.
- Logical Server Group: appropriate resources under this plan will be created on a particular logical server group.
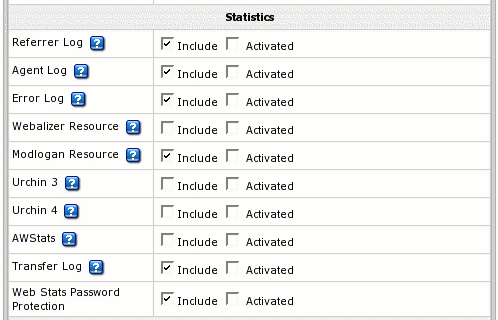
- Referrer Log: check the box to have separate referrer logs written into user directories. Referrer logs contain the URLs from which visitors were referred to your customer's site.
- Agent Log: check the box to have separate agent logs written into user directories. Agent logs contain data about visitors' browsers or any other Internet-based software, and related data.
- Error Log: check the box to have separate error logs written into user directories. Error logs store data about errors generated by the server (e.g. Page Not Found error) or by their cgi scripts.
- Webalizer Resource and Modlogan Resource: Check the boxes to install Webalizer and Modlogan into user directories. These freeware tools parse the transfer log and produce statistics reports in readable HTML format to be viewed through a browser.
- Urchin3 and Urchin4: Make sure to have Urchin installed and configured before enabling it in the plan. Check the sysadmin guide for Urchin installation and configuration.
- AWStats: another free tool that generates advanced graphical web server statistics reports. AWStats is set up on each Unix/Linux and Windows web server with Parallels H-Sphere installation or upgrade.
- Transfer Log: check the boxes to have transfer logs written into user directories. Transfer logs include combined data about every visit to your customer's site, including:
- Remote host IP (i.e. visitor's IP)
- Time of request (i.e. when visitor requested the page)
- First line of request
- Error generated by request, if any
- Size of message sent in response to the request
- Referrer (i.e. from which page visitor was directed)
- Agent ID (i.e. type of browser or another agent and related information, such as user's OS, etc.)
- Web Stats Password Protection, if enabled, will allow your users to password protect their sites' statistics compiled by Webalizer, AWStats and Modlogan.
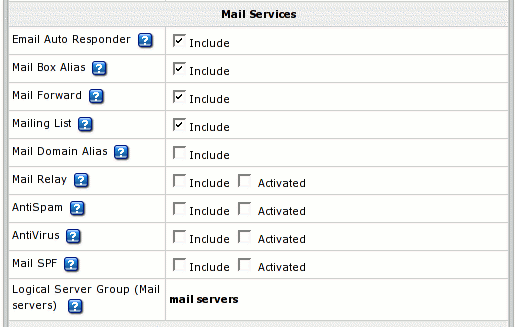
Allow or disallow your customers to create the above mail resources:
- Email Auto Responder: to automatically reply to senders with a uniform response when mail arrives in a mailbox.
- Mail Box Alias: to have an alternative address to an existing mailbox.
- Mail Forward: to automatically forward all incoming mail to a list of remote addresses.
- Mailing List: to send mail to multiple recipients.
- Mail Domain Alias: to have an alternative domain name to a mail domain. This is an obligatory resource for Email only plans, and therefore it's not listed as an option in their wizards. Important: Mail Domain Alias in the Email Only Plan is the same as Domain Alias.
- Mail Relay enable this option to ensure incoming mail is kept on the mail relay server, if your primary mail server goes down.
- AntiSpam to set spam filtering for user mail domains.
- AntiVirus to set virus filtering for user mailboxes.
- Logical Server Group (Mail servers): appropriate mail resources under this plan will be created on the particular logical server group
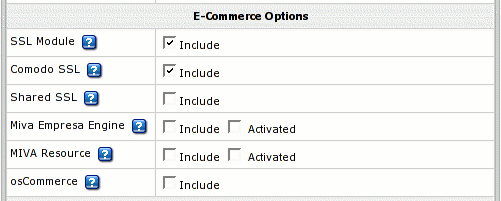
- SSL Module: enable your customers to use SSL (Secure Sockets Layer protocol) - a standard for transmitting confidential data such as credit card numbers over the Internet.
- Comodo SSL: allow buying and installing Comodo SSL directly from user CP.
- Shared SSL: provide SSL (Secure Sockets Layer) encryption and business authentication to Web business customers.
- Miva Resource: allow your users to create online stores with Miva Merchant. For more information visit www.miva.com/products/merchant/
- osCommerce: allow your users to create online stores using an open source e-commerce solution (osCommerce 2.1 release). For more information visit www.oscommerce.com.
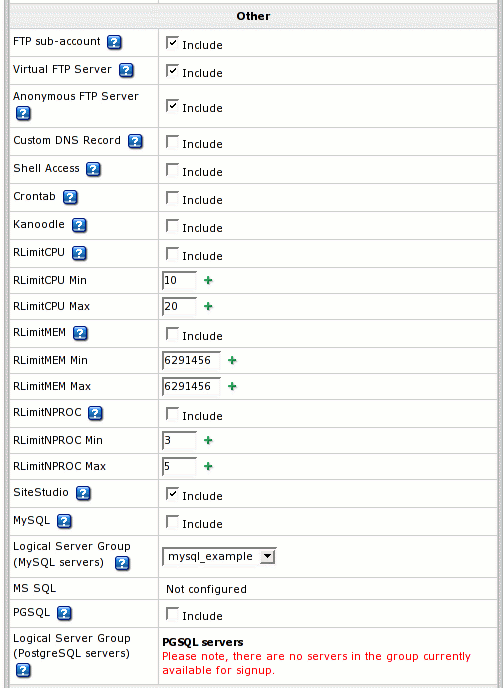
- FTP sub-account: allow or disallow your customer to create additional logins and passwords to his directory so his friends or colleagues can independently use it.
- Virtual FTP Server: allow or disallow your customers to let their friends and colleagues download, upload or view files in the dedicated directories.
- Anonymous FTP Server: allow or disallow your customers to let anybody else download, upload or view files in the dedicated directories.
- Custom DNS Record: allow your customers to create new custom DNS records.
- Shell Access: allow your customers to access and operate their accounts through Shell.
- Crontab: enable your customers to clock and run their own Unix shell scripts automatically.
- Kanoodle: enable your customers to promote their website.
- RLimitCPU: checking the box will restrict the CPU usage by users' cgi scripts.
- RLimitCPU Min - set the soft resource limit in seconds per process.
- RLimitCPU Max - set the maximum resource limit in seconds per process.
- RLimitMEM: checking the box will restrict the memory usage by user' cgi scripts.
- RLimitMEM Min - set the soft resource limit in bytes per process.
- RLimitMEM Max - set the maximum resource limit in bytes per process.
- RLimitNPROC: checking the box will restrict the number of simultaneous processes per user.
- RLimitNPROC Min - set the minimum number of processes.
- RLimitNPROC Max - set the maximum number of processes.
- Site Studio: allow your customers to use a powerful site construction tool enabling them to create a professional-looking site in a matter of minutes.
- MySQL, MS SQL, PGSQL: allow or disallow your customers to create and use their own databases.
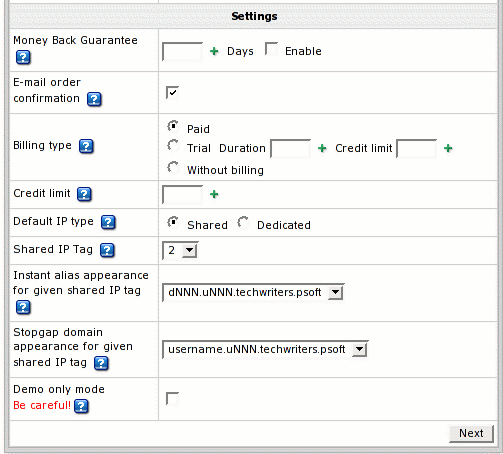
- Money Back Guarantee: the period in days after pay registration when users can claim back the recurrent fees they have paid if they decide to quit hosting services. The Money Back amount does not include the Setup Fees and is not affected by the refund percentage. The blank field sets it to zero, which disables the feature. Immediately takes effect and influences existent accounts. Recommended Value: less than 1 billing period.
- E-mail Order Confirmation: set the system to send e-mail copies of order confirmations to users registered under the plan. Note:
- e-mail invoices are sent to the e-mail address user provides in his billing info or contact info (in the absence of the first)
- the default can be overridden by individual user settings
- toggling the option doesn't affect settings of the existing users
- Billing Type:
- Paid: no trial period available.Note: don't switch to without billing.
- Trial: paid plan with trial period available. Check the box to enable trial registration for this plan. If the box is checked, you will have to fill in the following fields too:
- Duration: enter the duration of the trial period in days. Usually trial period does not exceed one month.
- Credit Limit: maximum amount of credit a trial user can run up acquiring paid resources. If you set Trial Credit Limit to zero, trial users will be able to acquire only free resources. Usually this amount either equals the initial registration payment plus the recurrent fee for one payment period, or exceeds it a bit to enable trial users to buy some extra resources. After this amount has been reached, the user cannot purchase any more resources. When trial users become pay users, they are charged the amount they have run up during the trial period.
Note: decreasing the trial period affects already signed up trial users so their trial time is 'cut'. Their accounts can be suspended if they have had their accounts more than the trial period is set to.
- Without billing: a totally free plan. Accounts registered without filling in the billing forms. Note: don't switch to paid.
- Credit Limit: amount of account's 'expenses' to be accumulated until it is charged.
- Default IP type: define the kind of IP user domains will get at signup (shared or dedicated). Each new user to signup for this plan will be given this kind of IP. Recommended value Shared. Note that:
- In the case of dedicated IPs, when you run out of dedicated IPs, newcomers won't be able to signup.
- Changing this parameter doesn't affect existent domains. Only new domains created under reconfigured plan will get the defined IP type. This is done either at signup or in the existent account.
- Shared IP Tag: a digital "mark" that is assigned to all accounts created under this plan. Don't change this value unless instructed to do so by your parent host. Recommended value 2.
Note: don't change the shared IP tag in Windows based plans if they have live accounts.
In Unix based plans changed shared IP tag immediately shows up in the system control panel interface, however it actually takes effect only when the changes to the server configuration are applied.
- Instant alias appearance for given shared IP tag: select a template to create user instant aliases. Instant aliases are based on your domain names and allow users to view their sites without using their own domains. The example of an instant alias appearance is username.kNNN.example.com, where kNNN is the name of the logical server, on which user's account is located. Changes to this parameter will apply only to new domains, while the existent domains will retain the 'old' shared IP tag.
- Stopgap domain appearance for given share IP tag: select a representation for user stopgap domains. Stopgap domains will allow users to maintain their sites and access them using instant domain aliases. Stopgap domain is not a real domain and does not allow the user to have any domain name, DNS zone, and e-mail service. However, stopgap domain users can have IP-only access if they purchase a dedicated IP. Changes to this parameter will apply only to new domains, while the existent domains will retain the 'old' shared IP tag.
- Demo only mode allow creating demo end user accounts to demonstrate the capabilities of Parallels H-Sphere without having to use real resources. In demo mode, resources and services aren't created or used, but their creation and usage is simulated in the user control panel. For instance, users can create mailboxes, and the control panel will behave as if the mailboxes have been created, but in fact they haven't.