Assigning Additional IP Ranges

When a client signs up to a dedicated server plan, he receives a server with only one IP address. If allowed by the plan, he can always request additional IPs from his control panel. Clients' requests for additional IPs are received by the trouble ticket system.

IP ranges can be assigned only to dedicated servers which are In use. To assign/unassign IP ranges, perform the following steps:

1. Set Prices for Extra IPs in Plans

Set prices for Dedicated Server IP Range resource in your dedicated server plans. Allow number of free IPs and set monthly fee per one IP.

2. Add IP Subnet

  1. Go Dedicated Servers -> IP Pool. The page similar to this appears:
  2. Click Add new IP subnet, enter subnet data and click Submit:

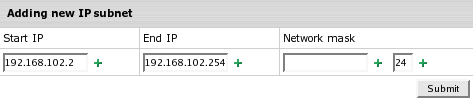
    Start IP - the IP next to the subnet broadcast address
    End IP - the IP preceding the subnet gateway address
    Network mask - a 32-bit number (e.g. 255.255.255.0) or a slash standard number (e.g. 24).

  3. Parallels H-Sphere will define for you the IP range available for assignment setting the first IP in the subnet as the Gateway address, the last IP - the Broadcast address. If a case, it also defines unusable IPs which don't fit the mask. Click Submit:

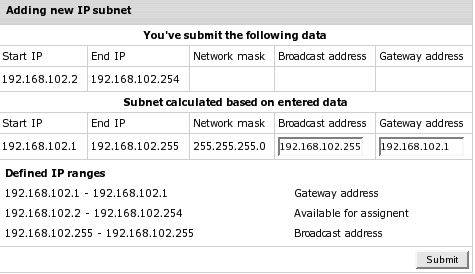
    The newly added IP subnet appears on the Dedicated servers IP pool page (see above).

3. Split IP Subnet to Smaller IP Ranges

  1. Go Dedicated Servers -> IP Pool and click the Edit icon opposite the needed range:
  2. Click the Split icon on the Defined IP ranges page:
  3. Enter the last IP in future range, depending on the number of IPs requested by user (10 in our case). Click submit:

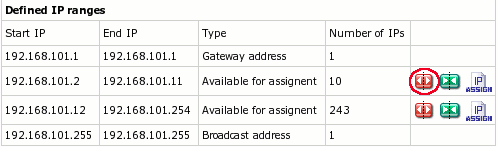
    You come back to the Defined IP ranges page where you can further split the ranges by clicking red arrows (the Split icon). You can also merge the corresponding ranges by clicking green arrows (the Merge icon):

4. Create PTR zone for Reverse DNS Records

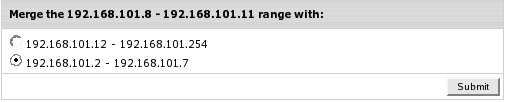
PTR zone is needed to store future reverse DNS records users will create for their IPs.

To create PTR zone, go Dedicated Servers -> IP Pool and click the Edit icon opposite the needed subnet and then click Create PTR DNS zone:

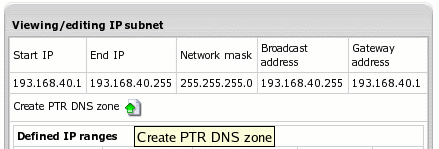
Now it should appear on this IP subnet page:

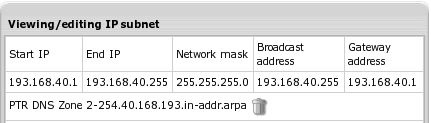
This will allow owner of dedicated server to which IP range from this subnet will be assigned to create PTR record for each IP from this range.

Important: Setting up reverse DNS records is implemented only for class C network IPs.

5. Assign IP Range to Dedicated Server

From the IP Pool page

  1. Go Dedicated Servers -> IP Pool. Click Edit against the needed IP subnet. On the page that appears click Assign opposite to the IP range to be assigned:
  2. On the Quick Search page choose the server to assign the range to:
  3. Add your comment on the IPs usage and click Submit:
  4. After that, the IPs are added to the server, and the IP range appears in the Defined IP ranges section as Assigned:

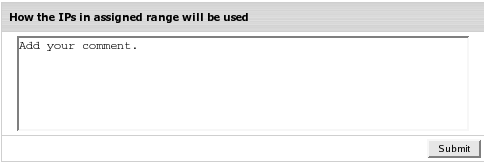
    Click Assigned to edit the dedicated server of the newly assigned range. By clicking the Lens icon, you can see the server info and the comment you've just added:

From the Manage Servers page

  1. Go Dedicated Servers -> Manage Servers and click Edit for the server to add IPs to:
  2. On the Dedicated Server page click Assign IP in the section:
  3. Select an IP subnet. A page similar to the following appears with IP ranges available for assignment. Choose one of them:
  4. Repeat steps 3 and 4 above.

6. Unassign IP Range

  1. Go Dedicated Servers -> Manage Servers and click Edit for the server to remove IPs from
  2. On the Dedicated Server page click Assign IP in the section:

Important: When assigning/unassigning IP ranges from the control panel, don't forget to effect these changes on the physical level.