Trial registration allows users to sign up and evaluate a full featured account for a set number of days (trial period) without being charged the fees to be paid for account setup and activity during the trial period if they decide to continue hosting with you. Trial registration can be enabled in any pay plan. Upon trial period expiry, the trial account automatically gets suspended.
To continue hosting with your company, a trial account's owner needs to become a pay user. If a trial account's owner becomes a check-pay user by the time their trial account has been suspended, resume their account, because it doesn't get automatically resumed, as opposed to credit card paid accounts.
Important: If a trial user happens to enter his valid credit card info, he will be immediately charged according to Billing Statement.
You can configure your system to automatically:
- warn trial account owners of approaching trial period expiry and account suspension;
- warn owners of suspended trial accounts of probable account deletion;
- delete suspended trial account.
To enable any of the above options:
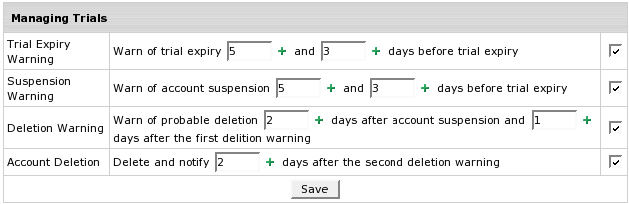
3. Set the option timing.
4. Click Save.
To edit the corresponding warning/notification message:
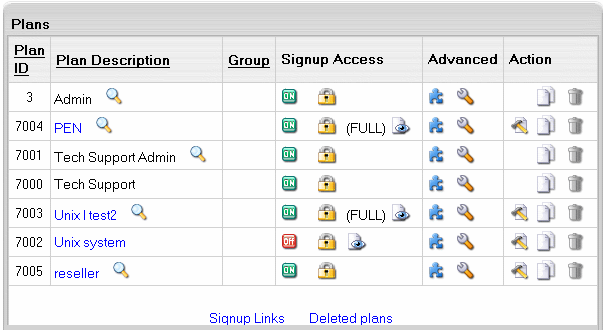
To enable trial hosting for an individual plan, do the following:
To ensure correct transition from one plan to another, you should always group plans based on their compatibility, so plans with the same settings belong to the same group. Don't group plans of different nature (for example Windows and Linux hosting), as this will lead to unexpected results. A very common mistake is to create dedicated Unix and Win2000 trial plans and put them in a separate trial plans group. On the one hand, this will not allow trial users to switch to pay plans, as they are in a different group. On the other hand, when switching from Win2000 Trial to Unix trial, a user will lose the settings that are unavailable under Unix plan, such as ASP and ODBC service.